

Introducing Metallic Felt
I have to confess, when I saw this metallic felt, I just got so excited, my focus was almost entirely on acquiring it and only minimally on what to do with it. There’s a whole new palette of felt, both regular and metallic, coming to the site, and all colors will be available in any shape.
With just a few colors of metallic in my collection so far, on the site I have listed black, champagne gold, and pink champagne. so what if you need something a little different? Or not quite so shiny? Or what in the heck do we do with this stuff anyway?
I found the metallic felt as cool as I had anticipated and very nice to work with. The first thing I did was cut a set in this new flower shape and sew them on to felt balls. I designed this cutter myself in 3 sizes, and only wish it worked better for shrink plastic. Felt flower sets are available HERE.
I simply tacked down each petal at the tip. So far, so good, but I don’t love that beige edge of wool that shows. In a perfect world I would be ordering customized felt with more exciting backing colors, but well, we’re not quite there yet.

Does it seem like I reach for a Sharpie every time? Well, here it worked wonders. You can see below, even as I’m coloring that edge, how it just disappears into the black of the felt ball. Working with the flower already attached probably wouldn’t be great for every color. I’m sure I got as much ink on the ball as I did on the edge.


Above, you can see I tried coloring the edges of a piece before sewing, as you would if your intended edge doesn’t match the foundation you’ll be using. Tweezers helped hold the petals while I coaxed the color into the edge. Wool is not very absorbent, so this took some patience. I’m excited to try dyeing this material. Maybe I won’t need to order custom colors after all.
Next I thought about how to work with the metallic side. Happily, this light gold is pretty neutral.
The first thing I sought to do was knock down the shine a bit. This is called a ‘brushed’ metallic finish, but it’s still very shiny, and what a pain to photograph!
I used 320-grit sandpaper on half of this scalloped circle.

The result is subtle but visible. I didn’t do any tweaking on the photo to enhance the sanded side. I think you could use 220-grit and still be okay.
As to the color of the metallic surface, of course I turned to back to the markers. The video below shows my experimentation with layering markers to achieve different shades of green. Simply coloring over the gold side will give you vivid color, and you can go over it to make the color darker. But I’m looking for a subtle effect, and besides I couldn’t find the exact green Sharpie I wanted. So I colored it with the one I had and then tried yellow and orange as toners, wiping it with my cotton pad to tame the colors.
Does it get any easier? And on the raw, shiny metallic side, you are pretty much immune from mistakes. You can wipe it all off if you don’t like what you’re getting. Any color that gets into the wool will be harder to remove, but you can blot much of it away and you’ll probably want to color that anyway, right?
If you sand your felt, the effect of coloring is very interesting!

Above is the half-sanded scalloped circle. You can still see that the right side is shadowed compared to the left. I colored across the bottom half to compare the effect of the marker on raw vs. unsanded surface. I colored and then blotted off with an alcohol-moistened cotton pad. The raw shiny side has returned to normal, but you can just see that where it was sanded, there is a kind of shadow or haze of the purple color. the effect is similar to shot silk or dichroic glass. This has potential!
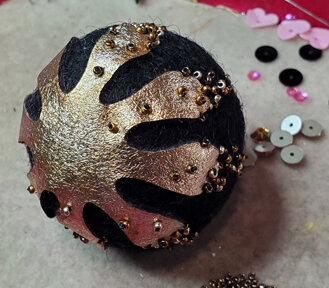
Which brings me back to that flower attached to the ball. I wanted to use bronze-colored seed beads with it, so I felt that a darker gold was called for, more like an ‘old gold’ or Florentine gold, you might call it. I used a light orange Sharpie, their name for the color is Tangerine; I think regular old Orange would work as well. I colored it on and dabbed it off. Since this piece isn’t sanded, I had to be careful not to remove it all. A couple of black and gold Shrinkets, some beads, and I’m done!

This piece contains:
One flower set in Champagne Gold, two of the smallest Shrinkets in the Flower Precuts sets; 3-, 2-, and 1cm felt balls, size 15 Miyuki seed beads in shades of light gold and bronze; and elements of the Black and Gold Collection.

